Руководство по барометрическому датчику BMP180 с Arduino
Эта статья посвящена тому, как использовать барометрический датчик BMP180 с Arduino. Она также применима и к другим аналогичным барометрическим датчикам.
Знакомство с барометрическим датчиком BMP180
Барометрический датчик BMP180 (модель GY-68) показан на следующем рисунке (вид спереди и сзади). Это очень маленький модуль размером 1 мм x 1,1 мм (0,039 дюйма x 0,043 дюйма).
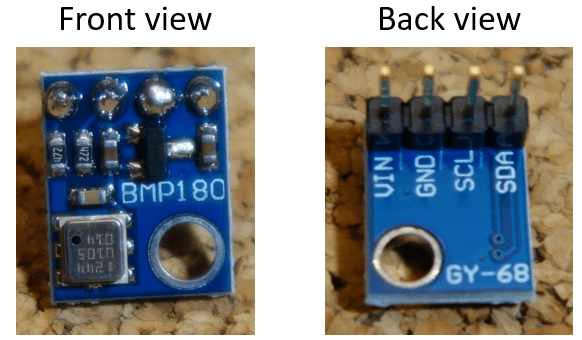
Он измеряет абсолютное давление окружающего воздуха. Диапазон измерений составляет от 300 до 1100 гПа с точностью до 0,02 гПа. Также он может измерять высоту и температуру.
Барометрический датчик BMP180 обменивается данными через интерфейс I2C. Это означает, что он взаимодействует с Arduino, используя всего 2 контакта.
Где купить?
Этот датчик очень дешёвый. Вы можете купить его примерно за $3. Найдите лучшую цену на Maker Advisor.
Вы можете воспользоваться приведёнными ссылками или перейти непосредственно на MakerAdvisor.com/tools, чтобы найти все детали для ваших проектов по лучшей цене!
Распиновка
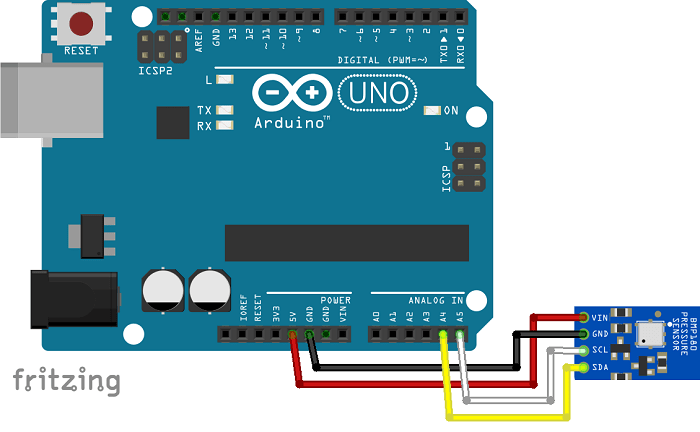
Подключение датчика к Arduino довольно простое:
Вывод |
Подключение к Arduino Uno |
|---|---|
Vin |
5V |
GND |
GND |
SCL |
A5 |
SDA |
A4 |
Схема подключения
Подключите датчик к Arduino, как показано на схеме ниже.
Код
Для управления барометрическим датчиком BMP180 необходимо установить библиотеку SFE_BMP180.
Установка библиотеки SFE_BMP180
Нажмите здесь, чтобы скачать библиотеку SFE_BMP180. В папке «Загрузки» должен появиться .zip-файл
Распакуйте .zip-файл, и вы получите папку BMP180_Breakout_Arduino_Library-master
Переименуйте папку из BMP180_Breakout_Arduino_Library-master в BMP180_Breakout_Arduino_Library
Переместите папку BMP180_Breakout_Arduino_Library в папку библиотек вашей Arduino IDE
После этого перезапустите Arduino IDE
Перейдите в File > Examples > SparkfunBMP180 > SFE_BMP180_example.
Этот пример очень хорошо прокомментирован и объясняет, как датчик считывает давление, температуру и вычисляет высоту.
/* SFE_BMP180 library example sketch

This sketch shows how to use the SFE_BMP180 library to read the
Bosch BMP180 barometric pressure sensor.
https://www.sparkfun.com/products/11824

Like most pressure sensors, the BMP180 measures absolute pressure.
This is the actual ambient pressure seen by the device, which will
vary with both altitude and weather.

Before taking a pressure reading you must take a temparture reading.
This is done with startTemperature() and getTemperature().
The result is in degrees C.

Once you have a temperature reading, you can take a pressure reading.
This is done with startPressure() and getPressure().
The result is in millibar (mb) aka hectopascals (hPa).

If you'll be monitoring weather patterns, you will probably want to
remove the effects of altitude. This will produce readings that can
be compared to the published pressure readings from other locations.
To do this, use the sealevel() function. You will need to provide
the known altitude at which the pressure was measured.

If you want to measure altitude, you will need to know the pressure
at a baseline altitude. This can be average sealevel pressure, or
a previous pressure reading at your altitude, in which case
subsequent altitude readings will be + or - the initial baseline.
This is done with the altitude() function.

Hardware connections:

- (GND) to GND
+ (VDD) to 3.3V

(WARNING: do not connect + to 5V or the sensor will be damaged!)

You will also need to connect the I2C pins (SCL and SDA) to your
Arduino. The pins are different on different Arduinos:

Any Arduino pins labeled:  SDA  SCL
Uno, Redboard, Pro:        A4   A5
Mega2560, Due:             20   21
Leonardo:                   2    3

Leave the IO (VDDIO) pin unconnected. This pin is for connecting
the BMP180 to systems with lower logic levels such as 1.8V

Have fun! -Your friends at SparkFun.

The SFE_BMP180 library uses floating-point equations developed by the
Weather Station Data Logger project: http://wmrx00.sourceforge.net/

Our example code uses the "beerware" license. You can do anything
you like with this code. No really, anything. If you find it useful,
buy me a beer someday.

V10 Mike Grusin, SparkFun Electronics 10/24/2013
*/

// Your sketch must #include this library, and the Wire library.
// (Wire is a standard library included with Arduino.):

#include <SFE_BMP180.h>
#include <Wire.h>

// You will need to create an SFE_BMP180 object, here called "pressure":

SFE_BMP180 pressure;

#define ALTITUDE 1655.0 // Altitude of SparkFun's HQ in Boulder, CO. in meters

void setup()
{
  Serial.begin(9600);
  Serial.println("REBOOT");

  // Initialize the sensor (it is important to get calibration values stored on the device).

  if (pressure.begin())
    Serial.println("BMP180 init success");
  else
  {
    // Oops, something went wrong, this is usually a connection problem,
    // see the comments at the top of this sketch for the proper connections.

    Serial.println("BMP180 init fail\n\n");
    while(1); // Pause forever.
  }
}

void loop()
{
  char status;
  double T,P,p0,a;

  // Loop here getting pressure readings every 10 seconds.

  // If you want sea-level-compensated pressure, as used in weather reports,
  // you will need to know the altitude at which your measurements are taken.
  // We're using a constant called ALTITUDE in this sketch:

  Serial.println();
  Serial.print("provided altitude: ");
  Serial.print(ALTITUDE,0);
  Serial.print(" meters, ");
  Serial.print(ALTITUDE*3.28084,0);
  Serial.println(" feet");

  // If you want to measure altitude, and not pressure, you will instead need
  // to provide a known baseline pressure. This is shown at the end of the sketch.

  // You must first get a temperature measurement to perform a pressure reading.

  // Start a temperature measurement:
  // If request is successful, the number of ms to wait is returned.
  // If request is unsuccessful, 0 is returned.

  status = pressure.startTemperature();
  if (status != 0)
  {
    // Wait for the measurement to complete:
    delay(status);

    // Retrieve the completed temperature measurement:
    // Note that the measurement is stored in the variable T.
    // Function returns 1 if successful, 0 if failure.

    status = pressure.getTemperature(T);
    if (status != 0)
    {
      // Print out the measurement:
      Serial.print("temperature: ");
      Serial.print(T,2);
      Serial.print(" deg C, ");
      Serial.print((9.0/5.0)*T+32.0,2);
      Serial.println(" deg F");

      // Start a pressure measurement:
      // The parameter is the oversampling setting, from 0 to 3 (highest res, longest wait).
      // If request is successful, the number of ms to wait is returned.
      // If request is unsuccessful, 0 is returned.

      status = pressure.startPressure(3);
      if (status != 0)
      {
        // Wait for the measurement to complete:
        delay(status);

        // Retrieve the completed pressure measurement:
        // Note that the measurement is stored in the variable P.
        // Note also that the function requires the previous temperature measurement (T).
        // (If temperature is stable, you can do one temperature measurement for a number of pressure measurements.)
        // Function returns 1 if successful, 0 if failure.

        status = pressure.getPressure(P,T);
        if (status != 0)
        {
          // Print out the measurement:
          Serial.print("absolute pressure: ");
          Serial.print(P,2);
          Serial.print(" mb, ");
          Serial.print(P*0.0295333727,2);
          Serial.println(" inHg");

          // The pressure sensor returns abolute pressure, which varies with altitude.
          // To remove the effects of altitude, use the sealevel function and your current altitude.
          // This number is commonly used in weather reports.
          // Parameters: P = absolute pressure in mb, ALTITUDE = current altitude in m.
          // Result: p0 = sea-level compensated pressure in mb

          p0 = pressure.sealevel(P,ALTITUDE); // we're at 1655 meters (Boulder, CO)
          Serial.print("relative (sea-level) pressure: ");
          Serial.print(p0,2);
          Serial.print(" mb, ");
          Serial.print(p0*0.0295333727,2);
          Serial.println(" inHg");

          // On the other hand, if you want to determine your altitude from the pressure reading,
          // use the altitude function along with a baseline pressure (sea-level or other).
          // Parameters: P = absolute pressure in mb, p0 = baseline pressure in mb.
          // Result: a = altitude in m.

          a = pressure.altitude(P,p0);
          Serial.print("computed altitude: ");
          Serial.print(a,0);
          Serial.print(" meters, ");
          Serial.print(a*3.28084,0);
          Serial.println(" feet");
        }
        else Serial.println("error retrieving pressure measurement\n");
      }
      else Serial.println("error starting pressure measurement\n");
    }
    else Serial.println("error retrieving temperature measurement\n");
  }
  else Serial.println("error starting temperature measurement\n");

  delay(5000);  // Pause for 5 seconds.
}
Настройка высоты
Перед загрузкой кода необходимо установить вашу текущую высоту над уровнем моря. Перейдите на сайт elevationmap.net, введите ваш адрес и узнайте высоту вашего местоположения. Установите вашу высоту в коде. Место, где нужно вписать высоту, отмечено комментарием.

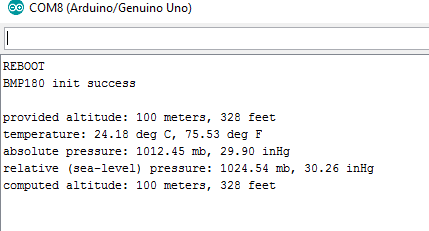
Демонстрация
После загрузки кода откройте монитор последовательного порта на скорости 9600 бод.
Вы увидите показания вашего датчика.
Заключение
BMP180 — это интересный датчик для использования в вашей собственной метеостанции.
Поскольку давление изменяется с высотой, этот датчик также способен вычислять высоту над уровнем моря.
Если вы хотите построить полноценную метеостанцию, вот несколько рекомендуемых руководств:
Полное руководство по датчику влажности и температуры DHT11/DHT22 с Arduino
Руководство по датчику влажности почвы YL-69 или HL-69 с Arduino
Какие ещё датчики вы считаете полезными для метеостанции? Напишите в комментариях ниже.
Спасибо за чтение.