ESP8266: публикация показаний DHT22 в базу данных SQLite
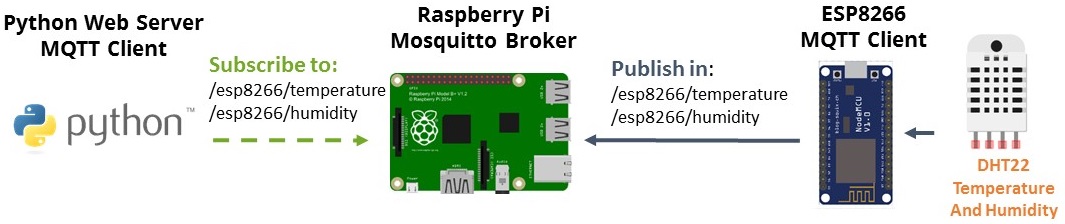
В этом проекте вы создадите автономный веб-сервер на Raspberry Pi, который отображает показания температуры и влажности с датчика DHT22, хранящиеся в базе данных SQLite.
Для создания веб-сервера вы будете использовать микрофреймворк Python под названием Flask. Вот общая схема системы:
Рекомендуемые ресурсы:
Вам понадобится плата Raspberry Pi — читайте Лучшие стартовые наборы Raspberry Pi
Если вам нравится домашняя автоматизация и вы хотите построить полноценную систему умного дома, рекомендуем скачать курс по домашней автоматизации.
Базовая настройка Raspberry Pi
Прежде чем продолжить чтение этого проекта, убедитесь, что на вашем Raspberry Pi установлена операционная система Raspbian.
Вы можете прочитать руководство «Начало работы с Raspberry Pi» ( :doc:`Getting Started with the Raspberry Pi Guide </raspberry/rnt/getting-started-with-raspberry-pi/index>`_ ), чтобы установить Raspbian и выполнить базовую настройку.
Запуск и установка брокера Mosquitto
Raspberry Pi будет взаимодействовать с ESP8266 по протоколу MQTT. Если :doc:`брокер Mosquitto установлен </raspberry/rnt/how-to-install-mosquitto-broker-on-raspberry-pi/index>`_, вам необходимо запустить брокер Mosquitto в фоновом режиме:
pi@raspberry:~ $ mosquitto -d
Установка Flask
Мы будем использовать микрофреймворк Python под названием Flask, чтобы превратить Raspberry Pi в веб-сервер.
Для установки Flask вам потребуется установленный pip. Выполните следующие команды для обновления Pi и установки pip:
pi@raspberrypi ~ $ sudo apt-get update
pi@raspberrypi ~ $ sudo apt-get upgrade
pi@raspberrypi ~ $ sudo apt-get install python-pip python-flask git-core
Затем используйте pip для установки Flask:
pi@raspberrypi ~ $ sudo pip install flask
Создание Python-скрипта
Это основной скрипт нашего приложения. Он настраивает веб-сервер, принимает показания температуры/влажности и сохраняет эти показания датчика в базе данных SQLite.
Для удобства организации начните с создания новой папки:
pi@raspberrypi ~ $ mkdir web-server
pi@raspberrypi ~ $ cd web-server
pi@raspberrypi:~/web-server $
Создайте новый файл с именем app.py.
pi@raspberrypi:~/web-server $ nano app.py
Скопируйте и вставьте следующий скрипт на ваш Raspberry Pi:
#
# Created by Rui Santos
# Complete project details: https://randomnerdtutorials.com
#

import paho.mqtt.client as mqtt
from flask import Flask, render_template, request
import json
import sqlite3

app = Flask(__name__)

def dict_factory(cursor, row):
    d = {}
    for idx, col in enumerate(cursor.description):
        d[col[0]] = row[idx]
    return d

# The callback for when the client receives a CONNACK response from the server.
def on_connect(client, userdata, flags, rc):
    print("Connected with result code " + str(rc))
    # Subscribing in on_connect() means that if we lose the connection and
    # reconnect then subscriptions will be renewed.
    client.subscribe("/esp8266/dhtreadings")

# The callback for when a PUBLISH message is received from the ESP8266.
def on_message(client, userdata, message):
    if message.topic == "/esp8266/dhtreadings":
        print("DHT readings update")
        #print(message.payload.json())
        #print(dhtreadings_json['temperature'])
        #print(dhtreadings_json['humidity'])

        dhtreadings_json = json.loads(message.payload)

        # connects to SQLite database. File is named "sensordata.db" without the quotes
        # WARNING: your database file should be in the same directory of the app.py file or have the correct path
        conn=sqlite3.connect('sensordata.db')
        c=conn.cursor()

        c.execute("""INSERT INTO dhtreadings (temperature,
            humidity, currentdate, currentime, device) VALUES((?), (?), date('now'),
            time('now'), (?))""", (dhtreadings_json['temperature'],
            dhtreadings_json['humidity'], 'esp8266') )

        conn.commit()
        conn.close()

mqttc=mqtt.Client()
mqttc.on_connect = on_connect
mqttc.on_message = on_message
mqttc.connect("localhost",1883,60)
mqttc.loop_start()

@app.route("/")
def main():
   # connects to SQLite database. File is named "sensordata.db" without the quotes
   # WARNING: your database file should be in the same directory of the app.py file or have the correct path
   conn=sqlite3.connect('sensordata.db')
   conn.row_factory = dict_factory
   c=conn.cursor()
   c.execute("SELECT * FROM dhtreadings ORDER BY id DESC LIMIT 20")
   readings = c.fetchall()
   #print(readings)
   return render_template('main.html', readings=readings)

if __name__ == "__main__":
   app.run(host='0.0.0.0', port=8181, debug=True)
Подготовка файла SQLite
Следуйте следующему руководству, чтобы узнать, :doc:`как установить базу данных SQLite на Raspberry Pi и подготовить базу данных </raspberry/rnt/sqlite-database-on-a-raspberry-pi/index>`_. Создайте файл базы данных SQLite со следующей схемой:
sqlite> .fullschema
CREATE TABLE dhtreadings(id INTEGER PRIMARY KEY AUTOINCREMENT, temperature NUMERIC, humidity NUMERIC, currentdate DATE, currentime TIME, device TEXT);
Ваш файл базы данных SQLite должен называться «sensordata.db» (без кавычек).
ВНИМАНИЕ: ваш файл базы данных должен находиться в той же директории, что и файл app.py, или содержать правильный путь в вашем Python-файле app.py, созданном в предыдущем разделе (раздел conn=sqlite3.connect(„sensordata.db“)).
Создание HTML-файла
Хранение HTML-тегов отдельно от вашего Python-скрипта — это способ поддерживать порядок в проекте. Flask использует шаблонизатор Jinja2, который позволяет отправлять динамические данные из вашего Python-скрипта в HTML-файл.
Создайте новую папку с именем templates:
pi@raspberrypi:~/web-server $ mkdir templates
pi@raspberrypi:~/web-server $ cd templates
pi@raspberrypi:~/web-server/templates $
Создайте новый файл с именем main.html.
pi@raspberrypi:~/web-server/templates $ nano main.html
Скопируйте и вставьте следующий шаблон на ваш Pi:
<!DOCTYPE html>
<head>
   <title>RPi Web Server</title>
   <!-- Latest compiled and minified CSS -->
   <link rel="stylesheet" href="https://maxcdn.bootstrapcdn.com/bootstrap/3.3.6/css/bootstrap.min.css" integrity="sha384-1q8mTJOASx8j1Au+a5WDVnPi2lkFfwwEAa8hDDdjZlpLegxhjVME1fgjWPGmkzs7" crossorigin="anonymous">
   <!-- Optional theme -->
   <link rel="stylesheet" href="https://maxcdn.bootstrapcdn.com/bootstrap/3.3.6/css/bootstrap-theme.min.css" integrity="sha384-fLW2N01lMqjakBkx3l/M9EahuwpSfeNvV63J5ezn3uZzapT0u7EYsXMjQV+0En5r" crossorigin="anonymous">
   <!-- Latest compiled and minified JavaScript -->
   <script src="https://maxcdn.bootstrapcdn.com/bootstrap/3.3.6/js/bootstrap.min.js" integrity="sha384-0mSbJDEHialfmuBBQP6A4Qrprq5OVfW37PRR3j5ELqxss1yVqOtnepnHVP9aJ7xS" crossorigin="anonymous"></script>
   <script src="https://code.jquery.com/jquery-3.1.1.min.js" integrity="sha256-hVVnYaiADRTO2PzUGmuLJr8BLUSjGIZsDYGmIJLv2b8=" crossorigin="anonymous"></script>
   <meta name="viewport" content="width=device-width, initial-scale=1">
</head>

<body>
   <h1>RPi Web Server - ESP8266 SQLite Data</h1>
   <table class="table table-hover">
     <tr><th>ID</th>
     <th>Temperature</th>
     <th>Humidity</th>
     <th>Date</th>
     <th>Time</th>
     <th>Device</th></tr>
     {% for entry in readings %}
        <tr><td>{{ entry.id }}</td>
        <td>{{ entry.temperature }}</td>
        <td>{{ entry.humidity }}</td>
        <td>{{ entry.currentdate }}</td>
        <td>{{ entry.currentime }}</td>
        <td>{{ entry.device }}</td></tr>
     {% endfor %}
   </table>
</body>
</html>
Программирование ESP8266
Для взаимодействия ESP8266 с веб-сервером Raspberry Pi необходимо установить библиотеку PubSubClient. Эта библиотека предоставляет клиент для простого обмена сообщениями по принципу публикации/подписки с сервером, поддерживающим MQTT (по сути, позволяет вашему ESP8266 общаться с веб-сервером Python).
Установка библиотеки PubSubClient
1) Нажмите здесь, чтобы скачать библиотеку PubSubClient. У вас должен появиться файл .zip в папке «Загрузки».
2) Распакуйте файл .zip, и вы получите папку pubsubclient-master.
3) Переименуйте папку из pubsubclient-master в pubsubclient.
4) Переместите папку pubsubclient в папку libraries вашей установки Arduino IDE.
Библиотека поставляется с рядом примеров скетчей. Смотрите File > Examples > PubSubClient в программе Arduino IDE.
Установка библиотеки датчика DHT
Библиотека датчика DHT предоставляет простой способ использования любого датчика DHT для считывания температуры и влажности с помощью плат ESP8266 или Arduino.
1) Нажмите здесь, чтобы скачать библиотеку датчика DHT. У вас должен появиться файл .zip в папке «Загрузки».
2) Распакуйте файл .zip, и вы получите папку DHT-sensor-library-master.
3) Переименуйте папку из DHT-sensor-library-master в DHT.
4) Переместите папку DHT в папку libraries вашей установки Arduino IDE.
5) Затем перезапустите Arduino IDE.
Загрузка скетча
Наконец, вы можете загрузить полный скетч на ваш ESP8266 (замените на ваш SSID, пароль и IP-адрес RPi):
/*****

 All the resources for this project:
 https://rntlab.com/

*****/

// Loading the ESP8266WiFi library and the PubSubClient library
#include <ESP8266WiFi.h>
#include <PubSubClient.h>
#include "DHT.h"

// Uncomment one of the lines bellow for whatever DHT sensor type you're using!
//#define DHTTYPE DHT11   // DHT 11
//#define DHTTYPE DHT21   // DHT 21 (AM2301)
#define DHTTYPE DHT22   // DHT 22  (AM2302), AM2321

// Change the credentials below, so your ESP8266 connects to your router
const char* ssid = "YOUR_SSID";
const char* password = "YOUR_PASSWORD";

// Change the variable to your Raspberry Pi IP address, so it connects to your MQTT broker
const char* mqtt_server = "YOUR_RPi_IP_Address";

// Initializes the espClient
WiFiClient espClient;
PubSubClient client(espClient);

// DHT Sensor
const int DHTPin = 14;

// Initialize DHT sensor.
DHT dht(DHTPin, DHTTYPE);

// Timers auxiliar variables
long now = millis();
long lastMeasure = 0;

char data[80];

// Don't change the function below. This functions connects your ESP8266 to your router
void setup_wifi() {
  delay(10);
  // We start by connecting to a WiFi network
  Serial.println();
  Serial.print("Connecting to ");
  Serial.println(ssid);
  WiFi.begin(ssid, password);
  while (WiFi.status() != WL_CONNECTED) {
    delay(500);
    Serial.print(".");
  }
  Serial.println("");
  Serial.print("WiFi connected - ESP IP address: ");
  Serial.println(WiFi.localIP());
}

// This functions is executed when some device publishes a message to a topic that your ESP8266 is subscribed to
// Change the function below to add logic to your program, so when a device publishes a message to a topic that
// your ESP8266 is subscribed you can actually do something
void callback(String topic, byte* message, unsigned int length) {
  Serial.print("Message arrived on topic: ");
  Serial.print(topic);
  Serial.print(". Message: ");
  String messageTemp;

  for (int i = 0; i < length; i++) {
    Serial.print((char)message[i]);
    messageTemp += (char)message[i];
  }
  Serial.println();
}

// This functions reconnects your ESP8266 to your MQTT broker
// Change the function below if you want to subscribe to more topics with your ESP8266
void reconnect() {
  // Loop until we're reconnected
  while (!client.connected()) {
    Serial.print("Attempting MQTT connection...");
    // Attempt to connect
     /*
     YOU  NEED TO CHANGE THIS NEXT LINE, IF YOU'RE HAVING PROBLEMS WITH MQTT MULTIPLE CONNECTIONS
     To change the ESP device ID, you will have to give a unique name to the ESP8266.
     Here's how it looks like now:
       if (client.connect("ESP8266Client")) {
     If you want more devices connected to the MQTT broker, you can do it like this:
       if (client.connect("ESPOffice")) {
     Then, for the other ESP:
       if (client.connect("ESPGarage")) {
      That should solve your MQTT multiple connections problem

     THE SECTION IN loop() function should match your device name
    */
    if (client.connect("ESP8266Client")) {
      Serial.println("connected");
      // Subscribe or resubscribe to a topic
      // You can subscribe to more topics (to control more LEDs in this example)
    } else {
      Serial.print("failed, rc=");
      Serial.print(client.state());
      Serial.println(" try again in 5 seconds");
      // Wait 5 seconds before retrying
      delay(5000);
    }
  }
}

// The setup function sets your DHT sensor, starts the serial communication at a baud rate of 115200
// Sets your mqtt broker and sets the callback function
// The callback function is what receives messages and actually controls the LEDs
void setup() {
  dht.begin();
  Serial.begin(115200);
  setup_wifi();
  client.setServer(mqtt_server, 1883);
  client.setCallback(callback);
}

// For this project, you don't need to change anything in the loop function.
// Basically it ensures that you ESP is connected to your broker
void loop() {
  if (!client.connected()) {
    reconnect();
  }
  if(!client.loop())
     /*
     YOU  NEED TO CHANGE THIS NEXT LINE, IF YOU'RE HAVING PROBLEMS WITH MQTT MULTIPLE CONNECTIONS
     To change the ESP device ID, you will have to give a unique name to the ESP8266.
     Here's how it looks like now:
       client.connect("ESP8266Client");
     If you want more devices connected to the MQTT broker, you can do it like this:
       client.connect("ESPOffice");
     Then, for the other ESP:
       client.connect("ESPGarage");
      That should solve your MQTT multiple connections problem

     THE SECTION IN recionnect() function should match your device name
    */
    client.connect("ESP8266Client");

  now = millis();
  // Publishes new temperature and humidity every 30 seconds
  if (now - lastMeasure > 10000) {
    lastMeasure = now;
    // Sensor readings may also be up to 2 seconds 'old' (its a very slow sensor)
    float h = dht.readHumidity();
    // Read temperature as Celsius (the default)
    float t = dht.readTemperature();
    // Read temperature as Fahrenheit (isFahrenheit = true)
    float f = dht.readTemperature(true);

    // Check if any reads failed and exit early (to try again).
    if (isnan(h) || isnan(t) || isnan(f)) {
      Serial.println("Failed to read from DHT sensor!");
      return;
    }

    // Computes temperature values in Celsius
    float hic = dht.computeHeatIndex(t, h, false);
    static char temperatureTemp[7];
    dtostrf(hic, 6, 2, temperatureTemp);

    // Uncomment to compute temperature values in Fahrenheit
    // float hif = dht.computeHeatIndex(f, h);
    // static char temperatureTemp[7];
    // dtostrf(hic, 6, 2, temperatureTemp);

    static char humidityTemp[7];
    dtostrf(h, 6, 2, humidityTemp);

    String dhtReadings = "{ \"temperature\": \"" + String(temperatureTemp) + "\", \"humidity\" : \"" + String(humidityTemp) + "\"}";
    dhtReadings.toCharArray(data, (dhtReadings.length() + 1));

    // Publishes Temperature and Humidity values
    client.publish("/esp8266/dhtreadings", data);
    Serial.println(data);
    Serial.print("Humidity: ");
    Serial.print(h);
    Serial.print(" %\t Temperature: ");
    Serial.print(t);
    Serial.print(" *C ");
    Serial.print(f);
    Serial.print(" *F\t Heat index: ");
    Serial.print(hic);
    Serial.println(" *C ");
    // Serial.print(hif);
    // Serial.println(" *F");
  }
}
Схема подключения
Для выполнения этого проекта вам понадобятся следующие компоненты:
Примечание: другие типы датчиков DHT также будут работать с небольшим изменением в коде.
Вы можете использовать ссылки выше или перейти непосредственно на MakerAdvisor.com/tools, чтобы найти все компоненты для ваших проектов по лучшей цене!
Вот схема подключения:
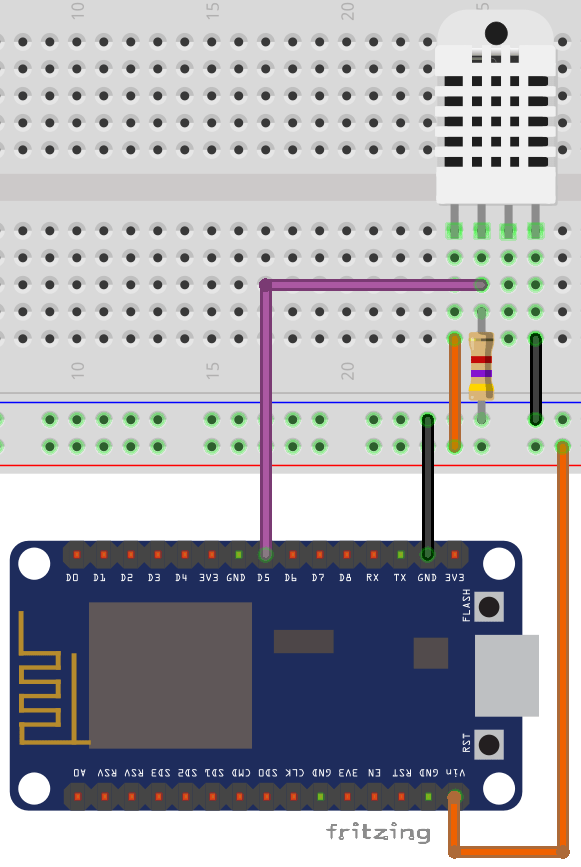
Важно: датчик DHT требует 5В для корректной работы, поэтому убедитесь, что вы используете пин Vin вашего ESP8266, который выдаёт 5В.
Запуск веб-сервера
Для запуска веб-сервера Raspberry Pi перейдите в папку, содержащую файл app.py:
pi@raspberrypi:~/web-server/templates $ cd ..
Затем выполните следующую команду:
pi@raspberrypi:~/web-server $ sudo python app.py
Ваш веб-сервер должен запуститься немедленно на порту :8181!
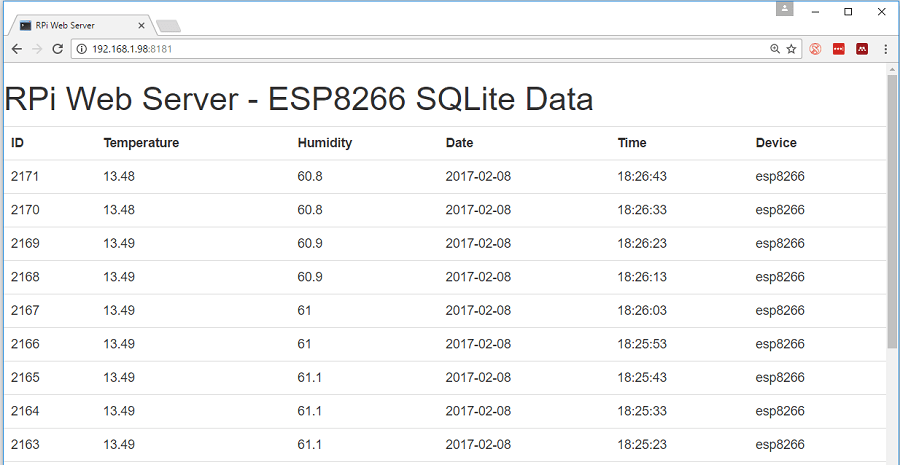
Демонстрация
Откройте адрес вашего Raspberry Pi в браузере, введя его IP-адрес, в моём случае: http://192.168.1.98:8181
Примечание: вы должны ввести ваш IP-адрес, за которым следует :8181
Подведение итогов
На этом пока всё, надеюсь, вы сможете взять эти примеры и создать больше функций, соответствующих вашим потребностям.
Нравится домашняя автоматизация? Узнайте больше о Node-RED, Raspberry Pi, ESP8266 и Arduino в нашем курсе: Создайте систему домашней автоматизации за $100.