Мониторинг уровня воды на основе Raspberry Pi
Собираем на базе Raspberry Pi систему мониторинга уровня воды с OLED-дисплеем, который показывает процент заполнения ведра.
Компоненты
Для реализации проекта по отслеживанию уровня воды в ведре на Raspberry Pi потребуются следующие компоненты:
Raspberry Pi Model 3 B
Зуммер
Ультразвуковой датчик HC-SR04
Перемычки
Дисплейный модуль ElectroPeak 0.96» OLED 64x128
Кувшин для воды
Ведро
OLED-дисплей будет показывать, на сколько процентов ведро заполнено водой.
Данный проект применим как в бытовых условиях, так и на крупных предприятиях, где необходимо контролировать уровень воды в больших резервуарах.
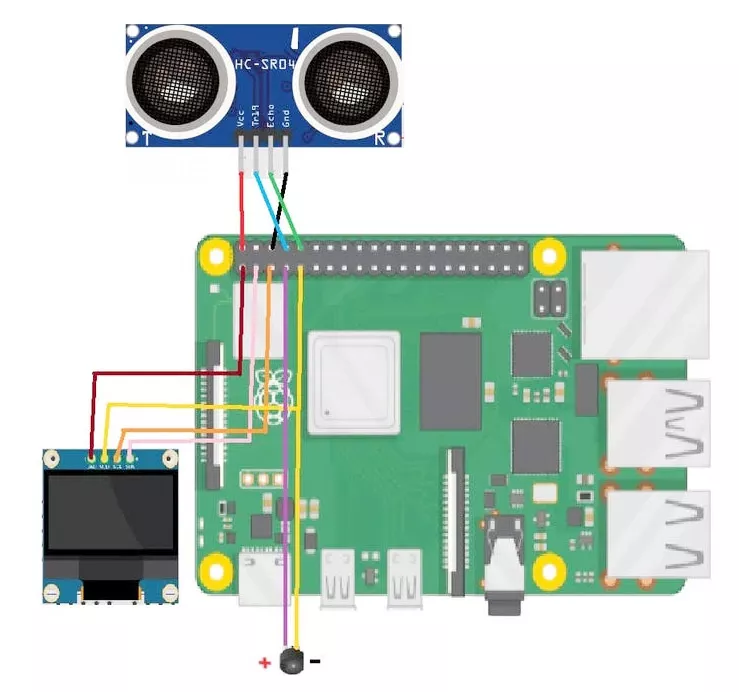
Схема соединения
Рассмотрим, как подключить ультразвуковой датчик, OLED-дисплей и зуммер к Raspberry Pi.
Ориентируйтесь на схему ниже:
Подключение HC-SR04:
Vcc <-> 5V Raspberry Pi
Gnd <-> Gnd Raspberry Pi
Trigger <-> GPIO 14
Echo <-> GPIO 15
Зуммер:
Buzzer + <-> GPIO 4
Buzzer – <-> Gnd
OLED дисплей:
Sda <-> GPIO 2 Raspberry Pi
Scl <-> GPIO 3 Raspberry Pi
Vcc <-> 3.3v Raspberry Pi
Gnd <-> Gnd Raspberry Pi
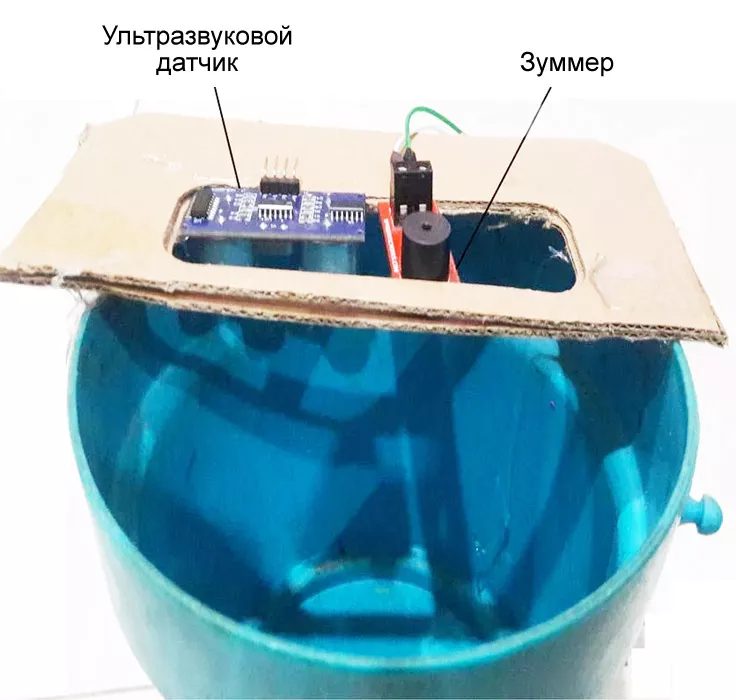
Закрепите опору на ведре. После этого установите на ней зуммер и ультразвуковой датчик.
Код проекта
Теперь, когда вы ознакомились с подключением и конструкцией, приступим к написанию программы.
Запустите IDE Thonny Python.
Вставьте приведенный ниже код.
Запустите программу на выполнение.
Скетч:
import time

import Adafruit_GPIO.SPI as SPI
import Adafruit_SSD1306

from PIL import Image
from PIL import ImageDraw
from PIL import ImageFont
import RPi.GPIO as GPIO
import time

# Raspberry Pi pin configuration:
RST = 24
# Note the following are only used with SPI:
DC = 23
SPI_PORT = 0
SPI_DEVICE = 0

TRIG = 14
ECHO = 15
i=0

dist_from_base =  10 # Write the distance from the sensor to the base of the bucket
GPIO.setmode(GPIO.BCM)
GPIO.setup(TRIG ,GPIO.OUT)
GPIO.setup(ECHO,GPIO.IN)
GPIO.setup(4 ,GPIO.OUT)

# 128x32 display with hardware I2C:
disp = Adafruit_SSD1306.SSD1306_128_64(rst=RST)

# Initialize library.
disp.begin()

# Clear display.
disp.clear()
disp.display()

# Create blank image for drawing.
# Make sure to create image with mode '1' for 1-bit color.
width = disp.width
height = disp.height
image = Image.new('1', (width, height))

# Get drawing object to draw on image.
draw = ImageDraw.Draw(image)

# Draw a black filled box to clear the image.
draw.rectangle((0,0,width,height), outline=0, fill=0)

# Draw some shapes.
# First define some constants to allow easy resizing of shapes.
padding = 2
shape_width = 20
top = padding
bottom = height-padding
# Move left to right keeping track of the current x position for drawing shapes.
x = padding
# Draw an ellipse.

# Load default font.
font = ImageFont.load_default()

# Some other nice fonts to try: http://www.dafont.com/bitmap.php
# font = ImageFont.truetype('Minecraftia.ttf', 8)
GPIO.output(TRIG, False)
print("Starting.....")
time.sleep(2)

while True:

    GPIO.output(TRIG, True)
    time.sleep(0.00001)
    GPIO.output(TRIG, False)

    while GPIO.input(ECHO)==0:
        pulse_start = time.time()

    while GPIO.input(ECHO)==1:
        pulse_stop = time.time()

    pulse_time = pulse_stop - pulse_start

    distance = pulse_time * 17150
    distance = round(distance)
    percentage = (distance * 100)/dist_from_base
    percentage = 100 - percentage
    percentage = round(percentage, 2)
    percentage = str(percentage)
    if distance > dist_from_base:
        distance = dist_from_base
    print(round(distance, 2));
    distance = str(distance)
    draw.text((x, top),    'Distance:',  font=font, fill=255)
    draw.text((x+60, top), distance, font=font, fill=255)
    draw.text((x+75, top), 'cm', font=font, fill=255)
    draw.text((x, top+ 20), 'percentage of bucket filled:', font=font, fill=255)
    draw.text((x, top+ 30), percentage, font=font, fill=255)
    draw.text((x+30, top +30), '%', font=font, fill=255)

    # Display image.
    disp.image(image)
    disp.display()
    distance = float(distance)
    time.sleep(1)
    disp.clear()
    draw.rectangle((0,0,width,height), outline=0, fill=0)

    if distance < 4:
        draw.text((x, top + 40),    'Water will overflow',  font=font, fill=255)
        print("Water will overflow")
        GPIO.output(4, True);
        time.sleep(0.5)
        GPIO.output(4, False);
        time.sleep(0.5)
        GPIO.output(4, True);
        time.sleep(0.5)
        GPIO.output(4, False);
        time.sleep(0.5)
    else:
        GPIO.output(4, False);
        # Write two lines of text.
В строке 25 необходимо указать расстояние от ультразвукового датчика до дна ведра.
dist_from_base = 10 # Write the distance from the sensor to the base of the bucket
Тестирование
Залейте воду в ведро. Когда расстояние от ультразвукового датчика до поверхности воды сократится примерно до 4 см, зуммер подаст звуковой сигнал, оповещая о том, что ведро почти полное, а на OLED-дисплее отобразится процент заполнения.