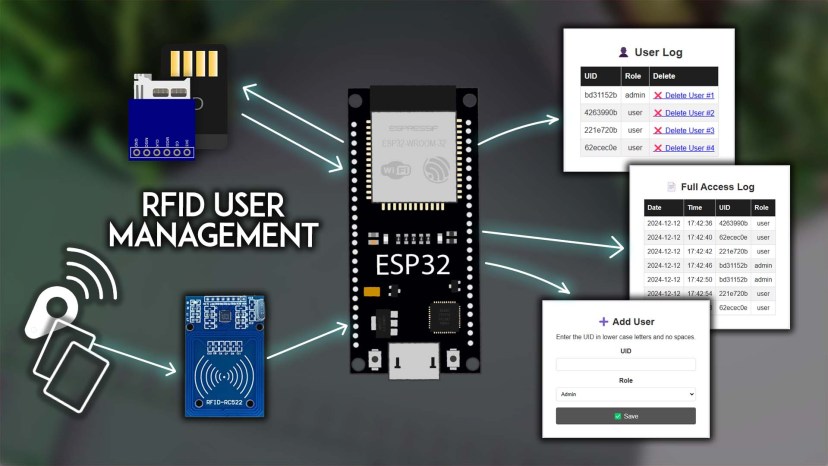
ESP32 система управления пользователями RFID с веб-сервером
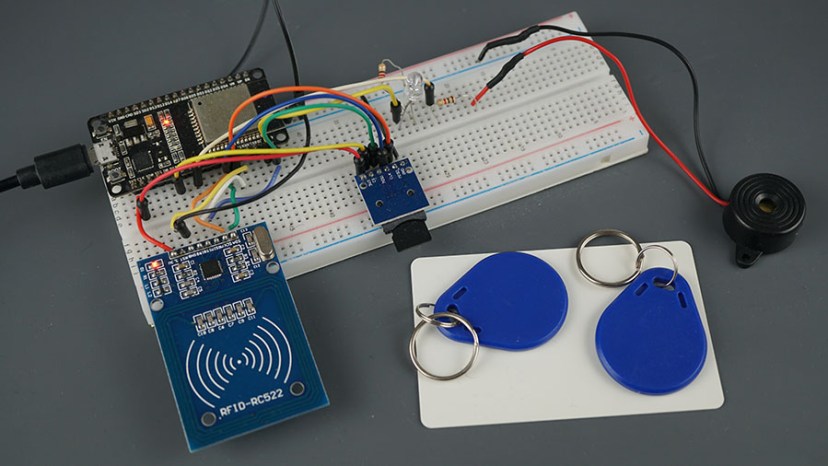
В этом проекте вы создадите систему управления пользователями RFID с веб-сервером, работающим на ESP32. Плата ESP32 подключена к RFID-считывателю MFRC522 и microSD-карте, на которой будут храниться все данные пользователей. ESP32 будет программироваться с помощью Arduino IDE и библиотеки Arduino_MFRC522v2.
В этом руководстве мы рассмотрим следующие темы:
Обзор проекта
На следующей диаграмме показан общий обзор работы проекта.
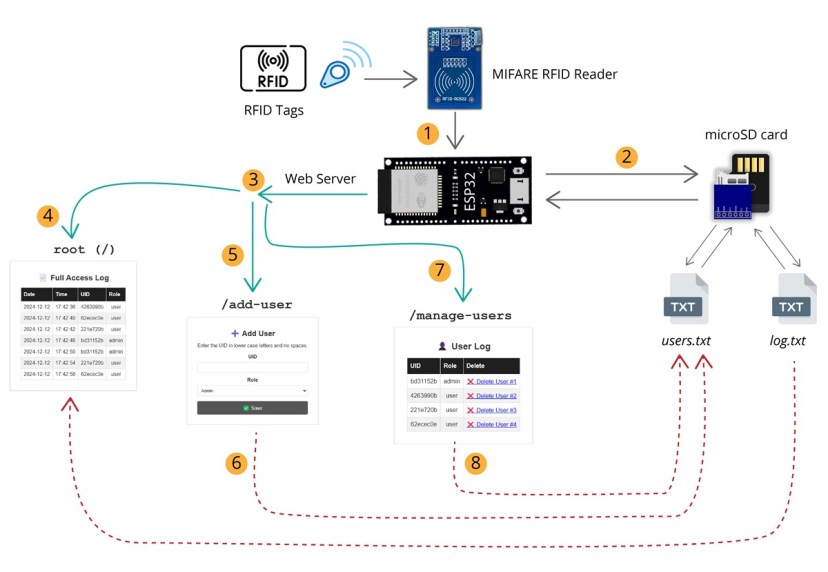
1) Когда вы подносите RFID-метку к считывателю MIFARE, он считывает её UID и отправляет информацию о ней на ESP32. При считывании метки зуммер издаёт звуковой сигнал и загорается светодиод.
2) ESP32 записывает время этого взаимодействия и сохраняет время и UUID на microSD-карте в файле log.txt.
3) ESP32 также размещает веб-сервер для отображения и управления информацией с microSD-карты.
4) Корневой URL (/) показывает полный журнал (сохранённый на microSD-карте в файле log.txt) с меткой времени и UID пользователя.
5) Есть ещё одна страница по адресу /add-user, которая позволяет добавлять пользователей и их роль с помощью формы.
6) Данные, введённые через эту форму, будут сохранены в файле user.txt на microSD-карте.
7) Есть ещё одна страница по адресу /manage-users, которая позволяет просматривать и удалять пользователей.
8) По сути, эта страница позволяет вам взаимодействовать с файлом users.txt.
Необходимые компоненты
Вот список необходимых компонентов для этого проекта:
Вы можете использовать ссылки выше или перейти на MakerAdvisor.com/tools для поиска всех компонентов по лучшей цене!
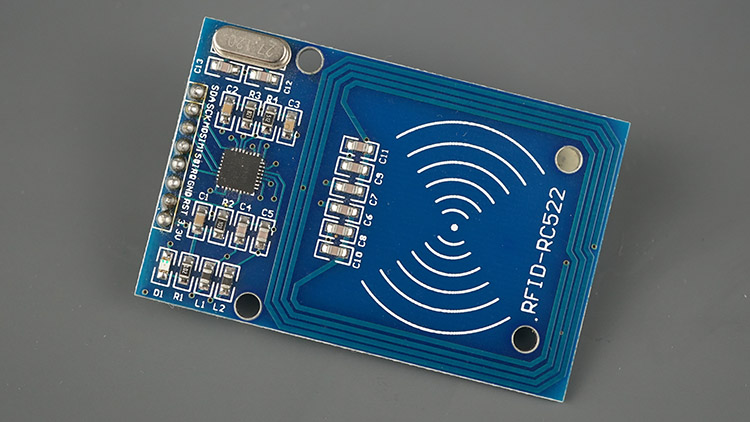
RFID-считыватель/записыватель MFRC522
В этом руководстве мы будем использовать RFID-считыватель/записыватель MFRC522, и именно его мы рекомендуем для работы с ESP32.
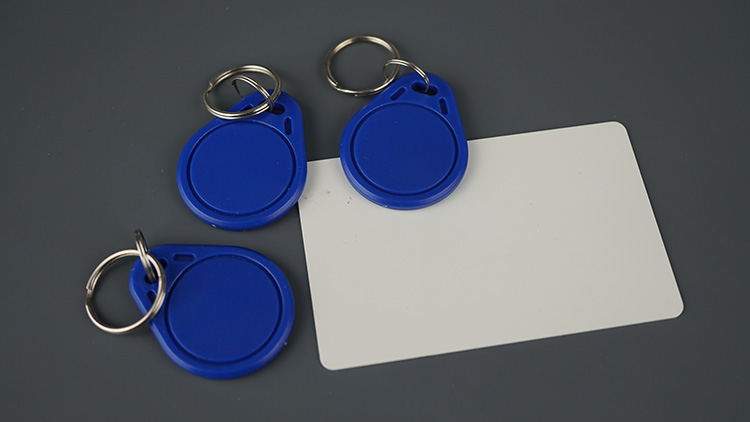
Вам также потребуются RFID-метки — у нас есть брелок и электромагнитная карта, которые поставляются с модулем RFID MFRC522. Каждая метка имеет уникальный идентификатор (UID), который будет присвоен каждому пользователю.
Рекомендуемое чтение: ESP32 с RFID-считывателем MFRC522 (Arduino IDE) — руководство по началу работы.
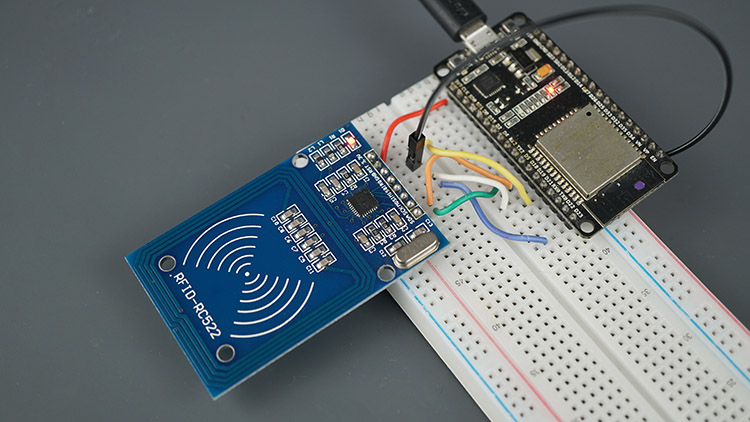
Подключение ESP32 к RFID-считывателю MFRC522
RFID-считыватель MFRC522 работает от 3.3 В и использует :doc:`протокол связи SPI <../esp32-spi-communication-arduino/index>`_. Мы подключим MFRC522 к стандартным SPI-пинам ESP32, используйте следующую таблицу как справку.
MFRC522 RFID-считыватель |
ESP32 |
Описание |
|---|---|---|
SDA |
GPIO 5 |
Вход сигнала SPI, линия данных I2C или вход данных UART |
SCK |
GPIO 18 |
Тактовый сигнал SPI |
MOSI |
GPIO 23 |
Вход данных SPI |
MISO |
GPIO 19 |
Master-in-slave-out SPI, тактовый сигнал I2C или последовательный выход UART |
IRQ |
Не подключать |
Пин прерывания; сигнализирует микроконтроллеру о приближении RFID-метки |
GND |
GND |
|
RST |
GPIO 21 |
Сигнал LOW переводит модуль в режим энергосбережения; сигнал HIGH для сброса модуля |
3.3V |
3.3V |
Питание (2.5-3.3 В) |
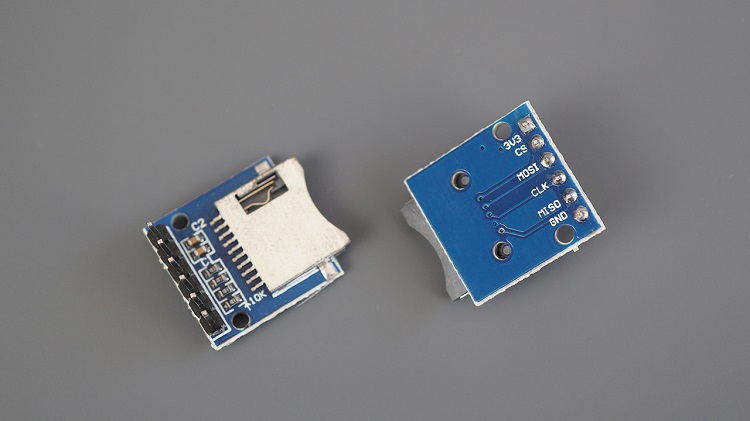
Модуль microSD-карты
Существуют различные модули microSD-карт, совместимые с ESP32. Мы используем модуль microSD-карты, показанный на следующем рисунке — он обменивается данными по протоколу SPI. Вы можете использовать любой другой модуль microSD-карты с интерфейсом SPI.
Чтобы узнать, как использовать модуль microSD-карты с ESP32, вы можете прочитать следующее руководство:
Подключение модуля microSD-карты к ESP32
Модуль microSD-карты обменивается данными по :doc:`протоколу связи SPI <../esp32-spi-communication-arduino/index>`_. Вы можете подключить его к ESP32, используя стандартные SPI-пины.
Модуль microSD-карты |
ESP32 |
|---|---|
3V3 |
3.3V |
CS |
GPIO 15 |
MOSI |
GPIO 23 |
CLK |
GPIO 18 |
MISO |
GPIO 19 |
GND |
GND |
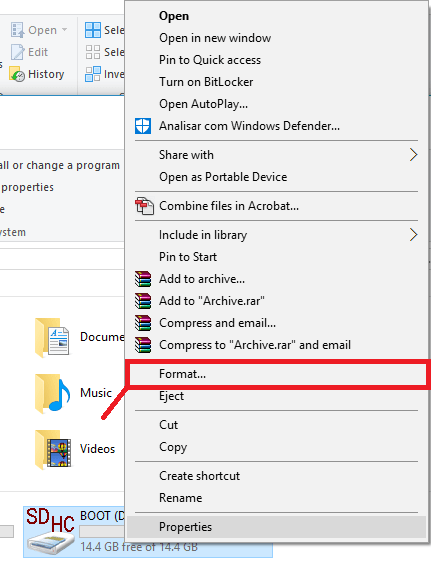
Подготовка microSD-карты
Перед продолжением работы с руководством убедитесь, что вы отформатировали microSD-карту в FAT32. Следуйте приведённым ниже инструкциям для форматирования карты или используйте программу вроде SD Card Formatter (совместима с Windows и Mac OS).
1. Вставьте microSD-карту в компьютер. Перейдите в Мой компьютер и щёлкните правой кнопкой мыши на SD-карте. Выберите Форматировать, как показано на рисунке ниже.
2. Появится новое окно. Выберите FAT32, нажмите Начать для запуска процесса форматирования и следуйте инструкциям на экране.
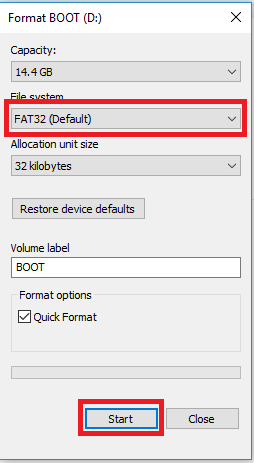
Схема подключения проекта ESP32 — подключение всех компонентов
Помимо RFID-считывателя и модуля microSD-карты, мы также подключим пьезозуммер и светодиод для обратной связи, чтобы знать, что RFID-считыватель MFRC522 прочитал новую метку.
Светодиод — подключён к GPIO 22 (через резистор 220 Ом)
Зуммер — подключён к GPIO 4 (через резистор 1 кОм)
Вот как выглядит финальная схема:
Подготовка Arduino IDE
Мы будем программировать плату ESP32 с помощью Arduino IDE. Убедитесь, что у вас установлено дополнение ESP32:
Для загрузки HTML- и CSS-файлов, необходимых для этого проекта, в файловую систему флеш-памяти ESP32 (LittleFS) мы будем использовать плагин для Arduino IDE: LittleFS Filesystem uploader. Следуйте руководству ниже для установки плагина загрузчика файловой системы в Arduino IDE 2, если вы этого ещё не сделали:
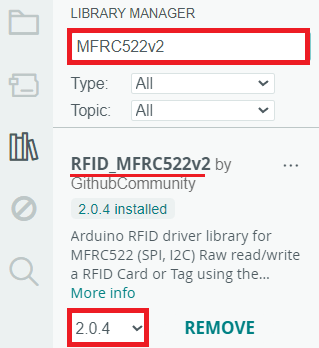
Установка библиотеки Arduino_MFRC522v2
В этом руководстве мы будем использовать библиотеку MFRC522v2.h для управления RFID-считывателем. В Arduino IDE перейдите в Sketch > Include Library > Manage Libraries или нажмите на значок Library Manager на левой боковой панели.
Найдите MFRC522v2 и установите библиотеку от GithubCommunity.
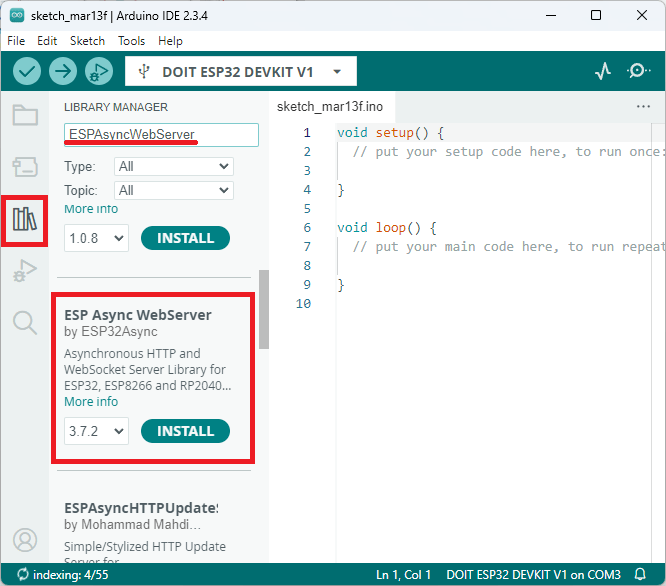
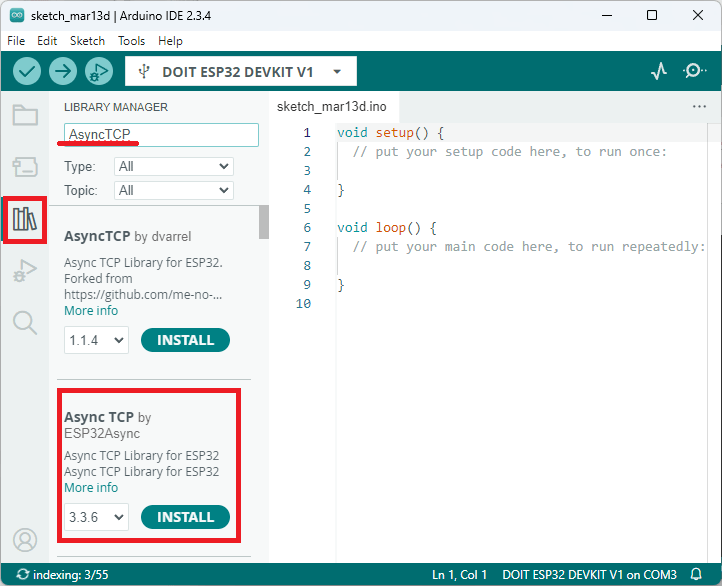
Библиотеки асинхронного веб-сервера
Мы создадим веб-сервер с помощью следующих библиотек:
ESPAsyncWebServer от ESP32Async
AsyncTCP от ESP32Async
Вы можете установить эти библиотеки через Arduino Library Manager. Откройте Library Manager, нажав на значок библиотеки на левой боковой панели.
Найдите ESPAsyncWebServer и установите ESPAsyncWebServer by ESP32Async.
Затем установите библиотеку AsyncTCP. Найдите AsyncTCP и установите AsyncTCP by ESP32Async.
Организация файлов
Для поддержания порядка в проекте и упрощения его понимания мы создадим 6 файлов для построения веб-сервера:
Скетч Arduino: для обработки веб-сервера, RFID-считывателя и microSD-карты;
full-log.html: загружает весь журнал каждой отсканированной RFID-карты и данные о пользователе;
manage-users.html: веб-страница для просмотра и удаления пользователей;
add-user.html: веб-страница для добавления новых пользователей с уникальным UID;
get.html: обрабатывает все HTTP GET-запросы;
style.css: для стилизации веб-страницы.
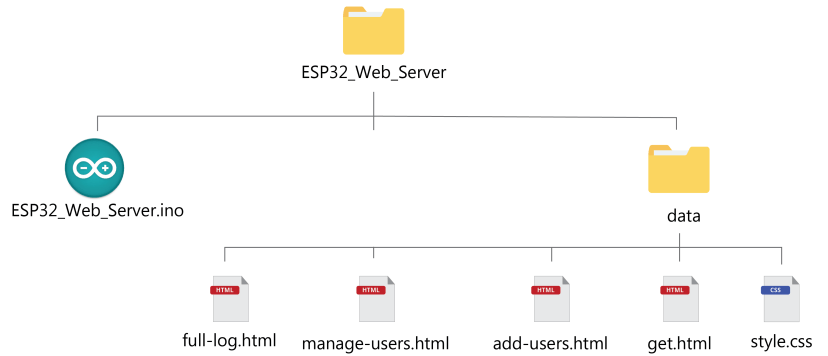
Вы должны сохранить HTML- и CSS-файлы внутри папки data в папке скетча Arduino, как показано на предыдущей диаграмме. Мы загрузим эти файлы в файловую систему ESP32 (LittleFS).
Вы можете скачать все файлы проекта:
HTML-файлы
Скопируйте следующее в файл full-log.html.
<!DOCTYPE html>
<html lang="en">
<head>
    <meta charset="UTF-8">
    <meta name="viewport" content="width=device-width, initial-scale=1.0">
    <title>Manage Users</title>
    <link rel="stylesheet" href="style.css">
</head>
<body>
    <nav>
        <div class="nav-container">
            <a href="/" class="brand">User Management</a>
            <ul class="nav-menu">
                <li><a href="/">📄 Full Log</a></li>
                <li><a href="add-user">➕ Add User</a></li>
                <li><a href="manage-users">👤 Manage Users</a></li>
            </ul>
        </div>
    </nav>
    <div class="main-container">
        <section class="main-section">
            <h2>📄 Full Access Log</h2>
            <table id="tableData">
                <thead>
                    <tr>
                        <th>Date</th>
                        <th>Time</th>
                        <th>UID</th>
                        <th>Role</th>
                    </tr>
                </thead>
                <tbody>
                    <!-- Data from log.txt will be loaded here -->
                </tbody>
            </table>
        </section>
    </div>
    <div class="main-container">
        <a href="get?delete=log"><button class="button button-delete">🗑️ Delete log.txt File</button></a>
    </div>
    <script>
        // JavaScript to load and parse log.txt
        async function loadTableData() {
            try {
                const response = await fetch('view-log');
                const data = await response.text();
                const rows = data.trim().split('\n').slice(1); // Skip the header line

                const tableBody = document.querySelector('#tableData tbody');
                rows.forEach(row => {
                    const columns = row.split(',');
                    const tr = document.createElement('tr');
                    columns.forEach(column => {
                        const td = document.createElement('td');
                        td.textContent = column;
                        tr.appendChild(td);
                    });
                    tableBody.appendChild(tr);
                });
            } catch (error) {
                console.error('Error loading log data:', error);
            }
        }
        // Call the function to load log data
        loadTableData();
    </script>
</body>
</html>
Скопируйте следующее в файл manage-users.html.
<!DOCTYPE html>
<html lang="en">
<head>
    <meta charset="UTF-8">
    <meta name="viewport" content="width=device-width, initial-scale=1.0">
    <title>Manage Users</title>
    <link rel="stylesheet" href="style.css">
</head>
<body>
    <nav>
        <div class="nav-container">
            <a href="/" class="brand">User Management</a>
            <ul class="nav-menu">
                <li><a href="/">📄 Full Log</a></li>
                <li><a href="add-user">➕ Add User</a></li>
                <li><a href="manage-users">👤 Manage Users</a></li>
            </ul>
        </div>
    </nav>
    <div class="main-container">
        <section class="main-section">
            <h2>👤 User Log</h2>
            <table id="tableData">
                <thead>
                    <tr>
                        <th>UID</th>
                        <th>Role</th>
                        <th>Delete</th>
                    </tr>
                </thead>
                <tbody>
                    <!-- Data from users.txt will be loaded here -->
                </tbody>
            </table>
        </section>
    </div>
    <div class="main-container">
        <a href="get?delete=users"><button class="button button-delete">🗑️ Delete users.txt File</button></a>
    </div>
    <script>
        // JavaScript to load and parse users.txt
        async function loadTableData() {
            try {
                const response = await fetch('view-users');
                const data = await response.text();
                const rows = data.trim().split('\n').slice(1); // Skip the header line

                const tableBody = document.querySelector('#tableData tbody');
                rows.forEach((row, index) => {
                    const columns = row.split(',');
                    const tr = document.createElement('tr');
                    // Add remaining columns
                    columns.forEach(column => {
                        const td = document.createElement('td');
                        td.textContent = column;
                        tr.appendChild(td);
                    });
                    // Create and add row number cell with a delete link
                    const noCell = document.createElement('td');
                    const deleteLink = document.createElement('a');
                    deleteLink.href = `get?delete-user=${index + 1}`;
                    deleteLink.textContent = "❌ Delete User #" + (index + 1);
                    noCell.appendChild(deleteLink);
                    tr.appendChild(noCell);

                    tableBody.appendChild(tr);
                });
            } catch (error) {
                console.error('Error loading log data:', error);
            }
        }
        // Call the function to load log data
        loadTableData();
    </script>
</body>
</html>
Скопируйте следующее в файл add-user.html.
<!DOCTYPE html>
<html lang="en">
<head>
    <meta charset="UTF-8">
    <meta name="viewport" content="width=device-width, initial-scale=1.0">
    <title>Add User</title>
    <link rel="stylesheet" href="style.css">
</head>
<body>
    <nav>
        <div class="nav-container">
            <a href="/" class="brand">User Management</a>
            <ul class="nav-menu">
                <li><a href="/">📄 Full Log</a></li>
                <li><a href="add-user">➕ Add User</a></li>
                <li><a href="manage-users">👤 Manage Users</a></li>
            </ul>
        </div>
    </nav>
    <div class="main-container">
        <section class="main-section">
            <h2>➕ Add User</h2>
            <p>Enter the UID in lower case letters and no spaces.</p><br>
            <form action="get" class="user-form">
                <label for="uid">UID</label>
                <input type="text" id="uid" name="uid" required>
                <label for="role">Role</label>
                <select id="role" name="role">
                    <option value="admin">Admin</option>
                    <option value="user">User</option>
                </select>
                <button type="submit">✅ Save</button>
            </form>
        </section>
    </div>
</body>
</html>
Скопируйте следующее в файл get.html.
<!DOCTYPE html>
<html lang="en">
<head>
    <meta charset="UTF-8">
    <meta name="viewport" content="width=device-width, initial-scale=1.0">
    <title>Add User</title>
    <link rel="stylesheet" href="style.css">
</head>
<body>
    <nav>
        <div class="nav-container">
            <a href="/" class="brand">User Management</a>
            <ul class="nav-menu">
                <li><a href="/">📄 Full Log</a></li>
                <li><a href="add-user">➕ Add User</a></li>
                <li><a href="manage-users">👤 Manage Users</a></li>
            </ul>
        </div>
    </nav>
    <div class="main-container">
        <section class="main-section">
            <p>%inputmessage%</p>
        </section>
    </div>
</body>
</html>
CSS-файл
Скопируйте следующее в файл style.css. Вы можете изменить его, чтобы веб-страница выглядела так, как вам нравится.
/* General Styles */
* {
    margin: 0;
    padding: 0;
    box-sizing: border-box;
}

body {
    font-family: Arial, sans-serif;
    background-color: #f4f4f9;
    color: #333;
    display: flex;
    flex-direction: column;
    align-items: center;
    height: 100vh;
    margin: 0;
}

/* Navigation Bar Styles */
nav {
    width: 100%;
    background-color: #333;
    padding: 1rem 0;
}

.nav-container {
    max-width: 1200px;
    margin: 0 auto;
    display: flex;
    justify-content: space-between;
    align-items: center;
    padding: 0 1rem;
}

.brand {
    color: #fff;
    text-decoration: none;
    font-size: 1.5rem;
    font-weight: bold;
}

.nav-menu {
    list-style-type: none;
    display: flex;
}

.nav-menu li {
    margin-left: 1.5rem;
}

.nav-menu a {
    color: #fff;
    text-decoration: none;
    font-size: 1rem;
    transition: color 0.3s;
}

.nav-menu a:hover, .nav-menu a.active {
    color: #f4f4f9;
}

.main-container {
    display: flex;
    justify-content: center;
    align-items: center;
    flex-grow: 1;
    width: 100%;
}

.main-section {
    max-width: 500px;
    padding: 2rem;
    background-color: #fff;
    border-radius: 5px;
    box-shadow: 0 4px 8px rgba(0, 0, 0, 0.1);
    text-align: center;
}

.main-section h2 {
    margin-bottom: 1rem;
    color: #333;
}

.user-form label {
    display: block;
    margin-bottom: 0.5rem;
    font-weight: bold;
    color: #333;
}

.user-form input, .user-form select {
    width: 100%;
    padding: 0.5rem;
    margin-bottom: 1rem;
    border: 1px solid #ddd;
    border-radius: 4px;
}

.user-form button {
    width: 100%;
    padding: 0.7rem;
    background-color: #333;
    color: #fff;
    border: none;
    border-radius: 4px;
    font-size: 1rem;
    cursor: pointer;
    transition: background-color 0.3s;
}

.user-form button:hover {
    background-color: #555;
}

.button {
    display: inline-block;
    padding: 10px 20px;
    margin: 10px;
    font-size: 16px;
    border: none;
    border-radius: 5px;
    cursor: pointer;
    transition-duration: 0.4s;
}

.button-delete {
    background-color: #780320;
    color: #fff;
}

.button-home {
    background-color: #333;
    color: #fff;
}

#tableData {
    font-family: Arial, Helvetica, sans-serif;
    border-collapse: collapse;
    width: 100%;
}

#tableData td, #tableData th {
    border: 1px solid #ddd;
    padding: 8px;
}

#tableData tr:nth-child(even) {
    background-color: #f2f2f2;
}

#tableData tr:hover {
    background-color: #ddd;
}

#tableData th {
    padding-top: 12px;
    padding-bottom: 12px;
    text-align: left;
    background-color: #1f1f1f;
    color: white;
}
Код — ESP32 система управления RFID с веб-сервером
Следующий код обрабатывает веб-сервер для системы управления пользователями RFID, как объяснено в обзоре проекта.
/*********
  Rui Santos & Sara Santos - Random Nerd Tutorials
  Complete instructions at https://RandomNerdTutorials.com/esp32-rfid-user-management-web-server/
  Permission is hereby granted, free of charge, to any person obtaining a copy of this software and associated documentation files.
  The above copyright notice and this permission notice shall be included in all copies or substantial portions of the Software.
*********/
#include <Arduino.h>
#include <MFRC522v2.h>
#include <MFRC522DriverSPI.h>
//#include <MFRC522DriverI2C.h>
#include <MFRC522DriverPinSimple.h>
#include <MFRC522Debug.h>

#include <AsyncTCP.h>
#include <ESPAsyncWebServer.h>
#include <LittleFS.h>

#include "FS.h"
#include "SD.h"
#include "SPI.h"
#include <time.h>
#include <WiFi.h>

// Learn more about using SPI/I2C or check the pin assigment for your board: https://github.com/OSSLibraries/Arduino_MFRC522v2#pin-layout
MFRC522DriverPinSimple ss_pin(5);

MFRC522DriverSPI driver{ss_pin}; // Create SPI driver
//MFRC522DriverI2C driver{};     // Create I2C driver
MFRC522 mfrc522{driver};         // Create MFRC522 instance

// Replace with your network credentials
const char* ssid = "REPLACE_WITH_YOUR_SSID";
const char* password = "REPLACE_WITH_YOUR_PASSWORD";

long timezone = 0;
byte daysavetime = 1;

// Create AsyncWebServer object on port 80
AsyncWebServer server(80);

const char* PARAM_INPUT_1 = "uid";
const char* PARAM_INPUT_2 = "role";
const char* PARAM_INPUT_3 = "delete";
const char* PARAM_INPUT_4 = "delete-user";

String inputMessage;
String inputParam;

const int ledPin = 22;
const int buzzerPin = 4;

// Write to the SD card
void writeFile(fs::FS &fs, const char * path, const char * message) {
  Serial.printf("Writing file: %s\n", path);

  File file = fs.open(path, FILE_WRITE);
  if(!file) {
    Serial.println("Failed to open file for writing");
    return;
  }
  if(file.print(message)) {
    Serial.println("File written");
  } else {
    Serial.println("Write failed");
  }
  file.close();
}

// Append data to the SD card
void appendFile(fs::FS &fs, const char * path, const char * message) {
  Serial.printf("Appending to file: %s\n", path);

  File file = fs.open(path, FILE_APPEND);
  if(!file) {
    Serial.println("Failed to open file for appending");
    return;
  }

  time_t t = file.getLastWrite();
  struct tm *tmstruct = localtime(&t);

  char bufferDate[50]; // Adjust buffer size as needed
  snprintf(bufferDate, sizeof(bufferDate), "%d-%02d-%02d",
          (tmstruct->tm_year) + 1900,
          (tmstruct->tm_mon) + 1,
          tmstruct->tm_mday);
  char bufferTime[50]; // Adjust buffer size as needed
  snprintf(bufferTime, sizeof(bufferTime), "%02d:%02d:%02d",
          tmstruct->tm_hour,
          tmstruct->tm_min,
          tmstruct->tm_sec);

  String lastWriteTime = bufferDate;
  String finalString = String(bufferDate) + "," + String(bufferTime) + "," + String(message) + "\n";
  Serial.println(lastWriteTime);
  if(file.print(finalString.c_str())) {
    Serial.println("Message appended");
  } else {
    Serial.println("Append failed");
  }
  file.close();
}

// Append data to the SD card
void appendUserFile(fs::FS &fs, const char * path, const char * message) {
  Serial.printf("Appending to file: %s\n", path);

  File file = fs.open(path, FILE_APPEND);
  if(!file) {
    Serial.println("Failed to open file for appending");
    return;
  }

  String finalString = String(message) + "\n";

  if(file.print(finalString.c_str())) {
    Serial.println("Message appended");
  } else {
    Serial.println("Append failed");
  }
  file.close();
}

void deleteFile(fs::FS &fs, const char *path) {
  Serial.printf("Deleting file: %s\n", path);
  if (fs.remove(path)) {
    Serial.println("File deleted");
  } else {
    Serial.println("Delete failed");
  }
}

String processor(const String& var){
  return String("HTTP GET request sent to your ESP on input field ("
                + inputParam + ") with value: " + inputMessage +
                "<br><a href=\"/\"><button class=\"button button-home\">Return to Home Page</button></a>");
}

void deleteLineFromFile(const char* filename, int lineNumber) {
  File file = SD.open(filename);
  if (!file) {
    Serial.println("Failed to open file for reading.");
    return;
  }

  // Read all lines except the one to delete
  String lines = "";
  int currentLine = 0;
  while (file.available()) {
    String line = file.readStringUntil('\n');
    if (currentLine != lineNumber) {
      lines += line + "\n";
    }
    currentLine++;
  }
  file.close();

  // Write back all lines except the deleted one
  file = SD.open(filename, FILE_WRITE);
  if (!file) {
    Serial.println("Failed to open file for writing.");
    return;
  }

  file.print(lines);
  file.close();
  Serial.println("Line deleted successfully.");
}

String getRoleFromFile(const char* filename, String uid) {
  File file = SD.open(filename);
  if (!file) {
    Serial.println("Failed to open file for reading.");
    return "";
  }

  // Skip the header line
  file.readStringUntil('\n');

  // Read each line and check for UID
  while (file.available()) {
    String line = file.readStringUntil('\n');

    int commaIndex = line.indexOf(',');
    if (commaIndex > 0) {
      String fileUID = line.substring(0, commaIndex);
      String role = line.substring(commaIndex + 1);

      // Compare UID
      if (fileUID == uid) {
        file.close();
        role.trim();  // Remove any extra spaces or newline characters
        return role;
      }
    }
  }
  file.close();
  return "";  // Return empty string if UID not found
}

void initRFIDReader() {
  mfrc522.PCD_Init();    // Init MFRC522 board.
  MFRC522Debug::PCD_DumpVersionToSerial(mfrc522, Serial);  // Show details of PCD - MFRC522 Card Reader details.
  Serial.println(F("Scan PICC to see UID"));
}

void initLittleFS() {
  if(!LittleFS.begin()){
    Serial.println("An Error has occurred while mounting LittleFS");
        return;
  }
}
void initWifi() {
  // Connect to Wi-Fi
  WiFi.begin(ssid, password);
  while (WiFi.status() != WL_CONNECTED) {
    delay(1000);
    Serial.println("Connecting to WiFi...");
  }
  // Print ESP32 Local IP Address
  Serial.print("ESP IP Address: ");
  Serial.println(WiFi.localIP());
}

void initTime() {
  Serial.println("CInitializing Time");
  struct tm tmstruct;
  delay(2000);
  tmstruct.tm_year = 0;
  getLocalTime(&tmstruct, 5000);
  Serial.printf(
    "Time and Date right now is : %d-%02d-%02d %02d:%02d:%02d\n", (tmstruct.tm_year) + 1900, (tmstruct.tm_mon) + 1, tmstruct.tm_mday, tmstruct.tm_hour, tmstruct.tm_min,
    tmstruct.tm_sec
  );
}

void initSDCard() {
  // CS pin = 15
  if (!SD.begin(15)) {
    Serial.println("Card Mount Failed");
    return;
  }
  uint8_t cardType = SD.cardType();

  if (cardType == CARD_NONE) {
    Serial.println("No SD card attached");
    return;
  }

  Serial.print("SD Card Type: ");
  if (cardType == CARD_MMC) {
    Serial.println("MMC");
  } else if (cardType == CARD_SD) {
    Serial.println("SDSC");
  } else if (cardType == CARD_SDHC) {
    Serial.println("SDHC");
  } else {
    Serial.println("UNKNOWN");
  }

  uint64_t cardSize = SD.cardSize() / (1024 * 1024);
  Serial.printf("SD Card Size: %lluMB\n", cardSize);

  // If the log.txt file doesn't exist, create a file on the SD card and write the header
  File file = SD.open("/log.txt");
  if(!file) {
    Serial.println("log.txt file doesn't exist");
    Serial.println("Creating file...");
    writeFile(SD, "/log.txt", "Date,Time,UID,Role\r\n");
  }
  else {
    Serial.println("log.txt file already exists");
  }
  file.close();

  // If the users.txt file doesn't exist, create a file on the SD card and write the header
  file = SD.open("/users.txt");
  if(!file) {
    Serial.println("users.txt file doesn't exist");
    Serial.println("Creating file...");
    writeFile(SD, "/users.txt", "UID,Role\r\n");
  }
  else {
    Serial.println("users.txt file already exists");
  }
  file.close();
}

void setup() {
  Serial.begin(115200);  // Initialize serial communication
  while (!Serial);       // Do nothing if no serial port is opened (added for Arduinos based on ATMEGA32U4).

  initRFIDReader();
  initLittleFS();
  initWifi();
  configTime(3600 * timezone, daysavetime * 3600, "time.nist.gov", "0.pool.ntp.org", "1.pool.ntp.org");
  initTime();
  initSDCard();

  pinMode(ledPin, OUTPUT);
  digitalWrite(ledPin, LOW);
  pinMode(buzzerPin, OUTPUT);
  digitalWrite(buzzerPin, LOW);

  // Route for root / web page
  server.on("/", HTTP_GET, [](AsyncWebServerRequest *request){
    request->send(LittleFS, "/full-log.html");
  });
  // Route for root /add-user web page
  server.on("/add-user", HTTP_GET, [](AsyncWebServerRequest *request){
    request->send(LittleFS, "/add-user.html");
  });
  // Route for root /manage-users web page
  server.on("/manage-users", HTTP_GET, [](AsyncWebServerRequest *request){
    request->send(LittleFS, "/manage-users.html");
  });

  // Serve Static files
  server.serveStatic("/", LittleFS, "/");

  // Loads the log.txt file
  server.on("/view-log", HTTP_GET, [](AsyncWebServerRequest *request){
    request->send(SD, "/log.txt", "text/plain", false);
  });
  // Loads the users.txt file
  server.on("/view-users", HTTP_GET, [](AsyncWebServerRequest *request){
    request->send(SD, "/users.txt", "text/plain", false);
  });

  // Receive HTTP GET requests on <ESP_IP>/get?input=<inputMessage>
  server.on("/get", HTTP_GET, [] (AsyncWebServerRequest *request) {
    // GET input1 and input2 value on <ESP_IP>/get?input1=<inputMessage1>&input2=<inputMessage2>
    if (request->hasParam(PARAM_INPUT_1) && request->hasParam(PARAM_INPUT_2)) {
      inputMessage = request->getParam(PARAM_INPUT_1)->value();
      inputParam = String(PARAM_INPUT_1);
      inputMessage += " " + request->getParam(PARAM_INPUT_2)->value();
      inputParam += " " + String(PARAM_INPUT_2);

      String finalMessageInput = String(request->getParam(PARAM_INPUT_1)->value()) + "," + String(request->getParam(PARAM_INPUT_2)->value());
      appendUserFile(SD, "/users.txt", finalMessageInput.c_str());
    }
    else if (request->hasParam(PARAM_INPUT_3)) {
      inputMessage = request->getParam(PARAM_INPUT_3)->value();
      inputParam = String(PARAM_INPUT_3);
      if(request->getParam(PARAM_INPUT_3)->value()=="users") {
        deleteFile(SD, "/users.txt");
      }
      else if(request->getParam(PARAM_INPUT_3)->value()=="log") {
        deleteFile(SD, "/log.txt");
      }
    }
    else if (request->hasParam(PARAM_INPUT_4)) {
      inputMessage = request->getParam(PARAM_INPUT_4)->value();
      inputParam = String(PARAM_INPUT_4);
      deleteLineFromFile("/users.txt", inputMessage.toInt());
    }
    else {
      inputMessage = "No message sent";
      inputParam = "none";
    }
    request->send(LittleFS, "/get.html", "text/html", false, processor);
  });

  // Start server
  server.begin();
}

void loop() {
  // Reset the loop if no new card present on the sensor/reader. This saves the entire process when idle.
  if (!mfrc522.PICC_IsNewCardPresent()) {
    return;
  }

  // Select one of the cards.
  if (!mfrc522.PICC_ReadCardSerial()) {
    return;
  }

  // Save the UID on a String variable
  String uidString = "";
  for (byte i = 0; i < mfrc522.uid.size; i++) {
    if (mfrc522.uid.uidByte[i] < 0x10) {
      uidString += "0";
    }
    uidString += String(mfrc522.uid.uidByte[i], HEX);
  }
  Serial.print("Card UID: ");
  Serial.println(uidString);

  String role = getRoleFromFile("/users.txt", uidString);
  if (role != "") {
    Serial.print("Role for UID: ");
    Serial.print(uidString);
    Serial.print(" is ");
    Serial.println(role);
  } else {
    role = "unknown";
    Serial.print("UID: ");
    Serial.print(uidString);
    Serial.println(" not found, set user role to unknown");
  }
  String sdMessage = uidString + "," + role;
  appendFile(SD, "/log.txt", sdMessage.c_str());

  digitalWrite(buzzerPin, HIGH);
  digitalWrite(ledPin, HIGH);
  delay(500);
  digitalWrite(buzzerPin, LOW);
  delay(2500);
  digitalWrite(ledPin, LOW);
}
Перед загрузкой кода вам необходимо вставить данные вашей сети Wi-Fi в следующие строки, чтобы ESP32 мог установить соединение.
const char* ssid = "REPLACE_WITH_YOUR_SSID";
const char* password = "REPLACE_WITH_YOUR_SSID";
Ресурсы для понимания кода
Этот код довольно длинный, и мы не будем подробно объяснять, как он работает, поскольку все рассматриваемые здесь темы уже были объяснены в предыдущих проектах.
Вот список руководств, которые вам следует изучить для понимания рассматриваемых тем:
1) Чтение UID RFID-метки с помощью ESP32: ESP32: начало работы с RFID-считывателем/записывателем MFRC522 (Arduino IDE).
2) Получение метки времени с помощью NTP-сервера: :doc:`ESP32 NTP Client-Server: получение даты и времени (Arduino IDE) <../esp32-date-time-ntp-client-server-arduino/index>`_.
3) Чтение и запись на microSD-карту: :doc:`ESP32: руководство по модулю MicroSD-карты с Arduino IDE <../esp32-microsd-card-arduino/index>`_.
4) Журналирование данных с ESP32: ESP32: как записывать данные (10 различных способов)
5) Создание веб-сервера с ESP32: список всех наших проектов веб-серверов.
6) Отправка данных с веб-страницы на ESP32 через HTML-форму: :doc:`Ввод данных в HTML-форме на веб-сервере ESP32/ESP8266 с Arduino IDE <../esp32-esp8266-input-data-html-form/index>`_.
7) Всё, что нужно знать о создании веб-сервера с HTML- и CSS-файлами на ESP32: наша электронная книга Build Web Server with ESP32 подробно охватывает множество тем.
Загрузка кода и папки data
После ввода данных вашей сети Wi-Fi сохраните код. Перейдите в Sketch > Show Sketch Folder и создайте папку data.
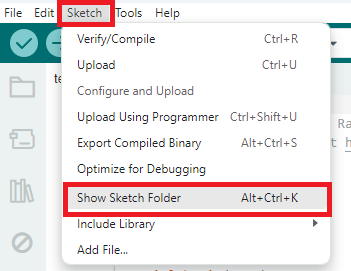
Внутрь этой папки поместите HTML- и CSS-файлы, предоставленные ранее.
Загрузка образа файловой системы
Загрузите эти файлы в файловую систему: нажмите [Ctrl] + [Shift] + [P] в Windows или [Cmd] + [Shift] + [P] в MacOS, чтобы открыть палитру команд. Найдите команду Upload LittleFS to Pico/ESP8266/ESP32 и нажмите на неё.
Если у вас нет этой опции, значит вы не установили плагин загрузчика файловой системы. Посмотрите это руководство.
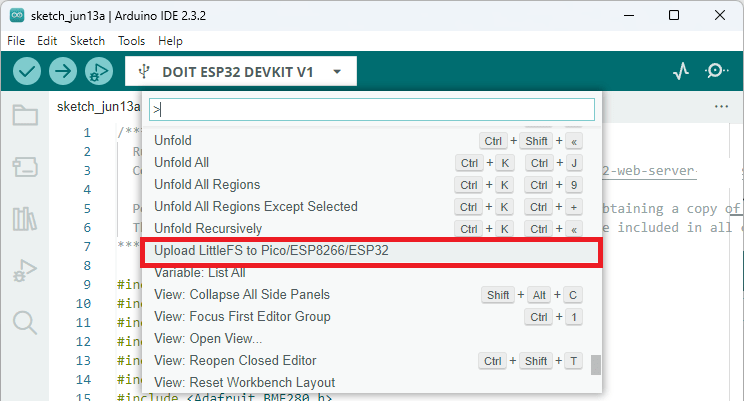
Важно: убедитесь, что Serial Monitor закрыт перед загрузкой в файловую систему. Иначе загрузка завершится ошибкой.
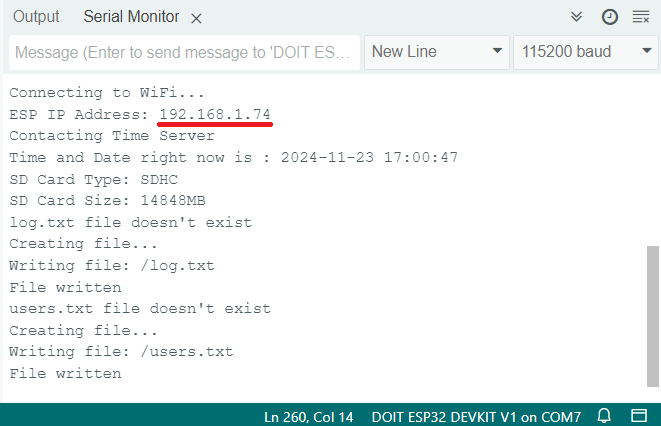
Загрузка кода
Затем загрузите код на вашу плату ESP32. Убедитесь, что вы ввели данные своей сети Wi-Fi в код.

Когда всё успешно загружено, откройте Serial Monitor на скорости 115200 бод. Нажмите кнопку EN/RST на ESP32, и в мониторе должен отобразиться IP-адрес ESP32.
Демонстрация
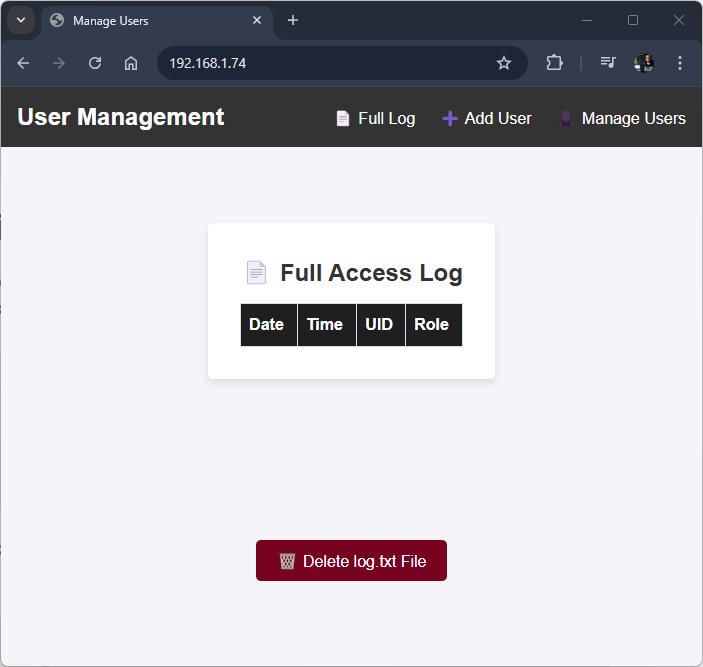
Откройте браузер в вашей локальной сети и введите IP-адрес ESP32. Вы должны получить доступ к веб-серверу, который выглядит следующим образом, с пустой таблицей по умолчанию.
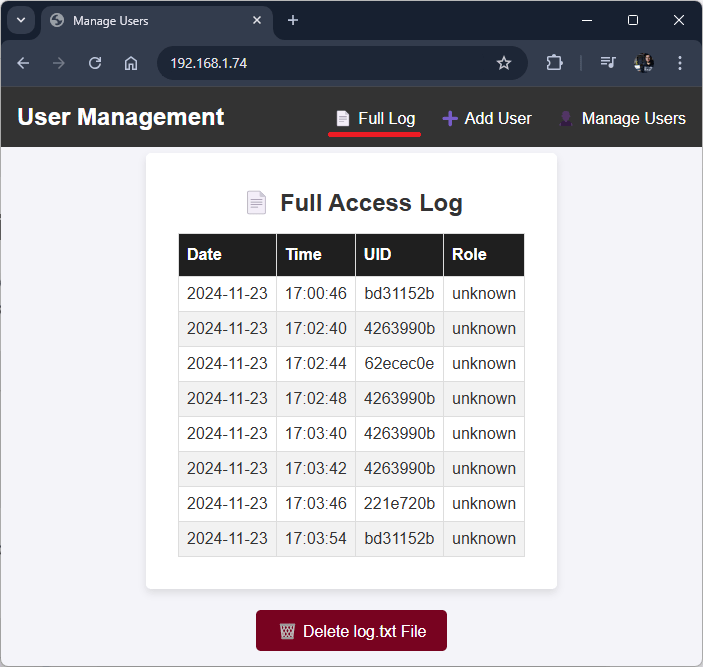
Возьмите RFID-метку и поднесите её к считывателю. Каждый раз при сканировании RFID-метки светодиод должен загораться, а пьезозуммер — издавать короткий звуковой сигнал. В Serial Monitor Arduino IDE будет выведен UID вашей RFID-карты:

В целях тестирования рекомендуется отсканировать несколько RFID-меток, чтобы получить больше данных для отображения на веб-сервере. Теперь откройте страницу Full Log вашего веб-сервера, таблица должна выглядеть примерно так:
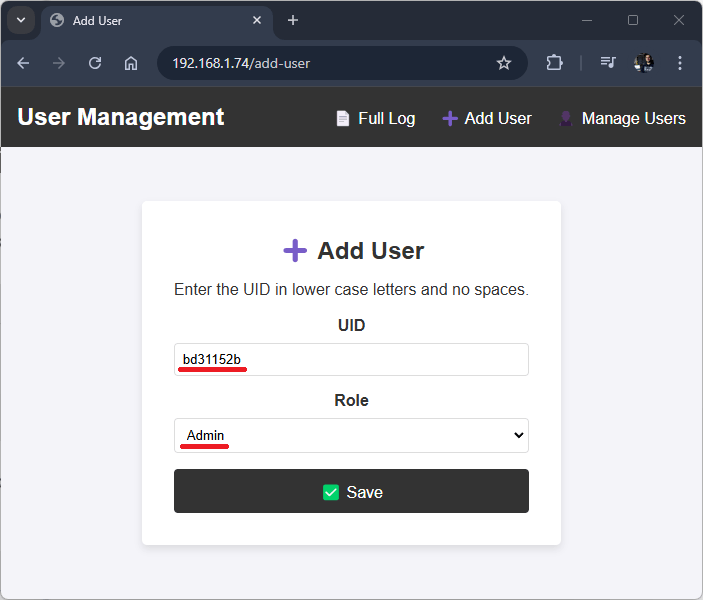
Скопируйте UID одной из ваших RFID-карт. Обратите внимание, что он должен быть в нижнем регистре и без пробелов (например: bd31152b). Затем откройте вкладку Add User.

Введите UID и выберите роль (user или admin). Наконец, нажмите кнопку «Save». Я повторю этот процесс для других RFID-меток в демонстрационных целях.
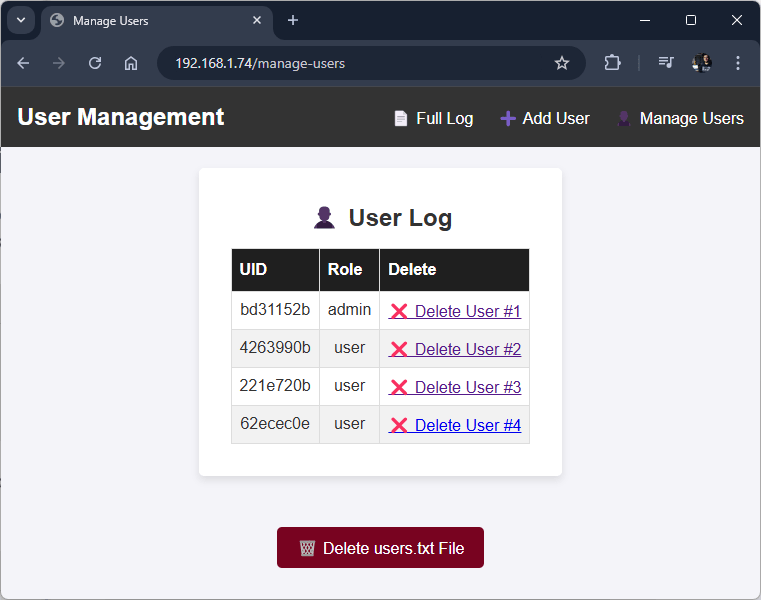
Теперь, если вы перейдёте на веб-страницу Manage Users:

Она загружает таблицу со всеми UID и соответствующими ролями пользователей. Вы можете нажать «X», чтобы удалить пользователя.
Отсканируйте RFID-метки ещё несколько раз, затем откройте домашнюю страницу веб-сервера. Таблица журнала должна содержать все записи с меткой времени, UID и соответствующими ролями пользователей.
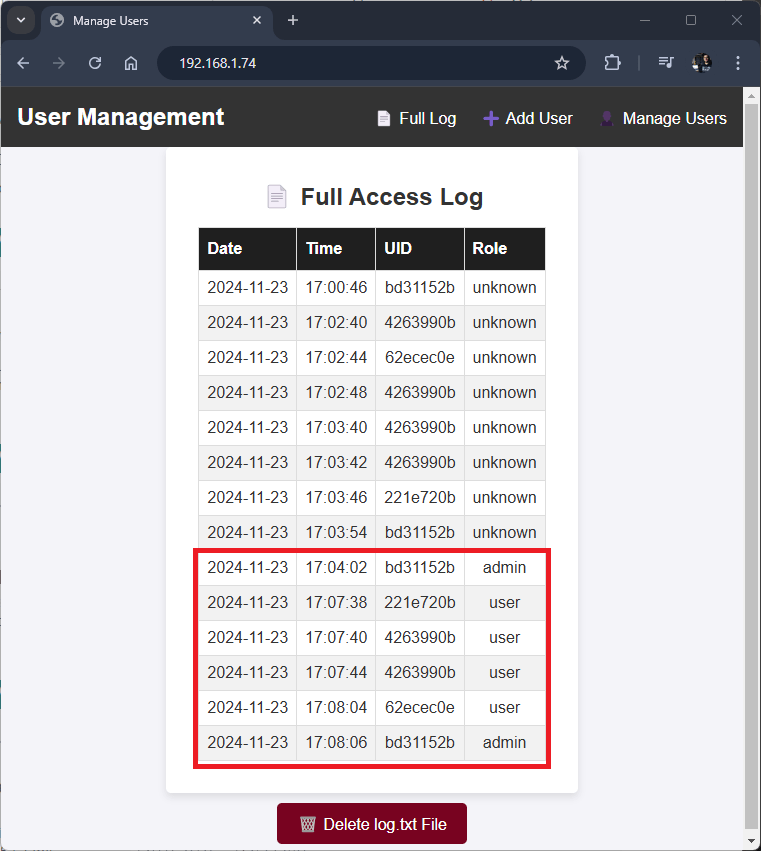
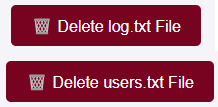
Внизу страниц Full Log и Manage Users есть возможность удалить файлы log.txt и users.txt с microSD-карты в любое время.
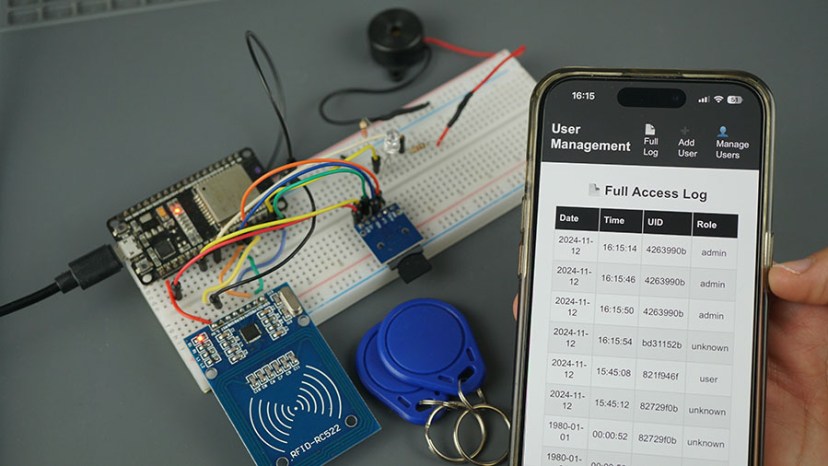
Вы также можете открыть страницу веб-сервера на смартфоне.
Заключение
В этом руководстве вы объединили различные темы для создания системы управления и журналирования RFID с ESP32. Вот список тем, которые мы рассмотрели: различные функции веб-сервера, получение метки времени, журналирование данных, взаимодействие с RFID-считывателем, чтение и запись файлов на microSD-карту и многое другое.
Надеемся, что этот проект был вам полезен. Если вы хотите узнать больше о модуле RFID-считывателя/записывателя с ESP32 или о модуле microSD-карты, вы можете прочитать следующие руководства:
Для получения дополнительной информации о создании веб-серверов с ESP32 посмотрите электронную книгу:
Если вы хотите узнать больше о ESP32 и получить вдохновение для новых проектов, ознакомьтесь с нашими ресурсами:
—
Источник: :doc:`ESP32 RFID User Management System with Web Server <../esp32-rfid-user-management-web-server/index>`_ — Rui Santos & Sara Santos, Random Nerd Tutorials